
The design elements must fit into one of the dashed line areas. The software doesn't automatically split for this hoop unless it is a text element. If the design is too large for one of these areas, you will get an error message. This hoop is really a way of combining multiple design elements into one space so that you can use the multi-position hoop. The three images below illustrate this. In the first image, there is only one design element, but it is larger than a 5x7 hoop segment and is in fixed stitch format. The design can't be broken up automatically, therefore the error message that is seen in hoop 2 will appear. The only thing this hoop splits automatically is text created with the text tool or individual design elements that fit into each of the hoop segments.

The custom hoop option may be worth a shot, but you would have to make sure you keep the finished size of the design to 120 x 300. Otherwise, you will have to hoop a second time as that is the section size of the 5x7 hoop in the Custom hoop area. I haven't tried the custom hoop feature with a multi-position hoop. I no longer have a machine that needs that hoop, so I don't have it.
For more information on the Custom hoop feature, look at pages 824-827 of my PE-DESIGN NEXT workbook.
Enjoy!
Cindy
©Cynthia Hogan 2016 all rights reserved. Images in the screenshots are of designs in the PE-DESIGN program

This image shows the motorcycle in one hoop and the lettering all the way across. It will split the lettering automatically. There is a workaround that you can try. This is to use the split stitches tool found on the Stitches attributes tab.
 |
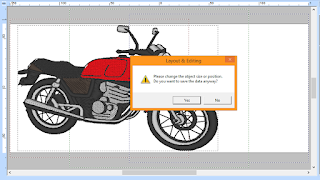
| This image shows the motorcycle is in one hoop, but the lettering goes all the way across the multi-position hoop. The software will split the lettering automatically, but it can't split the motorcycle automatically. There is a workaround you can. Click on the motorcycle, click on the Stitches Attributes tab at the top of the window and choose the Split Stitches tool. |
 |
| With the Split Stitches tool, draw around part of the motorcycle. Make sure the part you surround fits into one hoop. Double click and the design will split into 2 parts. |
 |
| I have moved the right side away so you can see the split. The software does feather the edges, but it doesn't add any extra stitches to keep it from having a gap when it is embroidered. |
 |
| This design would split automatically because there are 3 separate design elements that make up the design. |
For more information on the Custom hoop feature, look at pages 824-827 of my PE-DESIGN NEXT workbook.
Enjoy!
Cindy
©Cynthia Hogan 2016 all rights reserved. Images in the screenshots are of designs in the PE-DESIGN program